

Mushroom season is here 🍄 Now's a good time to plant mushroom beds and inoculate logs! Browse our outdoor range
Thinking of ordering for Christmas? Select the ‘Xmas Pre-order’ option to reserve your kits for December delivery 🎁
Split Gill Mushroom Kit Instructions
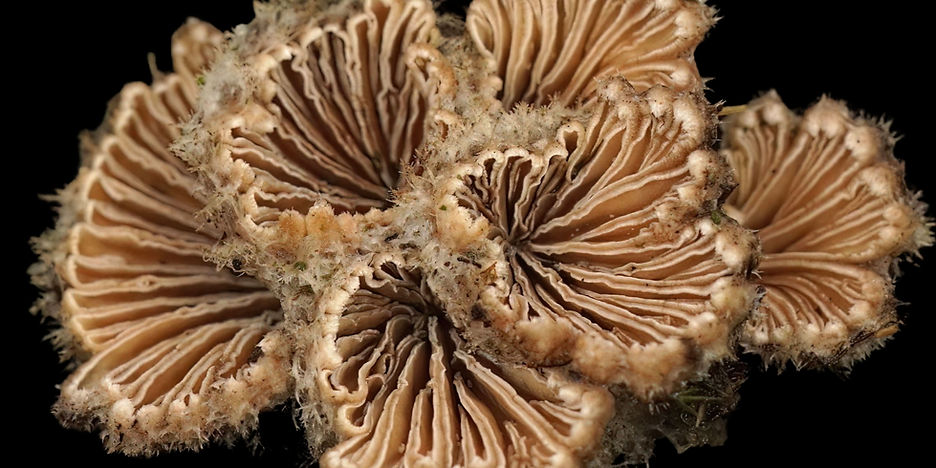
Split gill (Schizophyllum commune) is one of the world's most remarkable mushrooms. Found on decaying wood across nearly every continent, it is easily recognised by its tiny fan-shaped caps and distinctive gills that split down the middle. Beyond its unusual appearance, split gill is famous for having more than 28,000 mating types—often described as "genders"—giving it one of the most complex reproductive systems known in nature.
This mushroom has a long history of culinary use in parts of Southeast Asia, India, Africa, and Latin America. It is commonly added to soups, stews, and stir-fries, where its firm texture holds up well during cooking.
Each species of mushroom is a different growing experience. Even if you have grown mushrooms before, please read the instructions for your kit carefully before proceeding. If you run into any problems please see our FAQ.
Step 1: Finding an Ideal Location
Split gill mushrooms grow best when they are out of direct sunlight and have plenty of humidity and fresh air. Finding or creating the perfect environment is key to getting the most mushrooms out of your kit.
-
Find a humid spot with indirect sunlight or with access to ambient light to place your block. Near the kitchen sink or in the bathroom is often a good choice. Do not enclose in a box or cupboard, as split gill need access to fresh air.
-
If you've purchased a thermometer/hygrometer, a humidity reading over 50% and a temperature reading between 19°C and 30°C is ideal.
Step 2: Initiating Fruiting
In nature, the mushroom fruiting process is triggered by a range of changes in the environment. Fresh air and ambient light become available as the mycelium breaks through the ground layer or the extremities of a log. Seasonal changes bring wetter weather and humidity increases. You will now imitate these changes in the following way:
-
First, open the box and remove your fruiting block
-
Using a clean knife, make 2 straight slits on each wide side of the block
Step 3: Misting
Mushrooms prefer to grow in an environment with 80-90% humidity. Because of this, you'll need to gently mist your kit regularly with a clean spray bottle. You want to create a humid environment for the mushrooms and to keep their bodies moist, rather than to 'water' them as you would a plant.
-
Before your mushrooms begin to grow, a gentle mist 4-6 inches from the slits 3 - 5 times a week.
-
If you are using a large, household spray bottle, be sure it is set to 'mist' instead of 'stream' and mist from 6-8 inches from the box.
-
Once you see your mushrooms begin to pin, mist them 2-3 times a day and make sure to keep the mushrooms moist as they won't be able to grow if they begin to dry out.
Step 4: Pinning

'Pinning' should begin within 4 weeks of initiating fruiting. If you haven't seen any pinning after 4 weeks please see our FAQ. Once they have begun to pin, your mushrooms will grow rapidly.
Step 5: When to Harvest
Harvest your cluster of mushrooms after they have begun to form caps, but before the edges of the mushrooms begin to either flip up or darken. It is best to harvest your splitgill mushrooms while they are young, as they can become quite tough and woody with age.
Mushrooms have begun to pin, but are not yet ready to harest

Mushrooms are ready to harvest - they have not yet begun to darken or flip up

The caps have flipped up and the mushrooms are beginning to darken. These will have a tougher texture and are not choice for eating.
Step 6: Harvest
-
The best way to harvest is to use a sharp knife to slice the clusters of mushrooms cleanly off at the slits without taking the woody substrate with it.
-
Cut off any growing medium that has stuck to your mushrooms before cooking
Step 7: Initiating The Next Flush
Did you know that your box has the ability to produce several clusters or 'flushes' of mushrooms over time?
Place your kit in the fridge for 12-24 hours. The change in temperature tricks the mycelium into thinking that the seasons are changing and will encourage them to flush.
You can then return your kit to your chosen location and repeat steps 4-7. Times between flushes can vary from 3-9 weeks, so be patient and don't forget to keep the humidity up by misting. Your kit may flush several times, but the amount of mushrooms will reduce with each flush and the time between flushes will increase.
For more detailed tips on encouraging more flushes out of your kit, please check our FAQ page here.
Step 8: What to do with your kit when it stops producing mushrooms
Did you know that fungi play a key role in storing carbon? Trees and plants remove carbon from the atmosphere and fungi break down plant waste to create new carbon-rich soil. Clean air, healthy soil and delicious mushrooms: just one of the many ways fungi are incredible!
Once your box has finished flushing, open the box and remove the mycelium block from its plastic bag. Discard the bag in the general waste or wash it throughly and recycle it with 'soft plastics'. You can now recycle the box and additional packaging and compost the block. Alternately plant it in the garden to see if it will gain a some energy and produce one last seasonal crop for you! Simply dig a hole in a shady spot, bury the block and cover it over with around 5cm of soil. Water it occasionally to keep the soil moist.

We hope you've enjoyed growing your splitgill mushrooms!
We're passionate about sharing the diversity of the fungi kingdom & making more of its delights easy to grow. Want to try another strain or learn how to cultivate mushrooms? See our full range of mushroom growing kits and cultivation workshops!